Full K80CS keyboard case
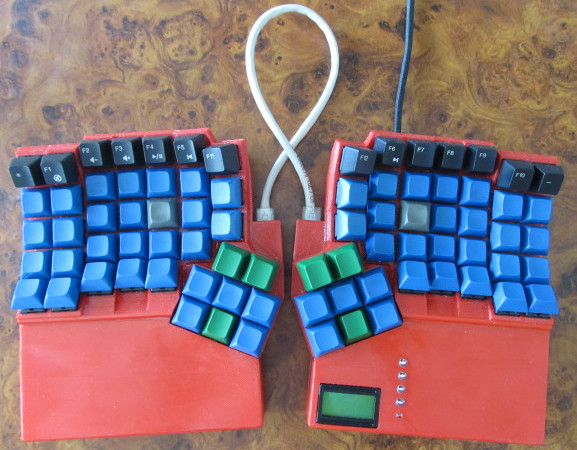
This is information about STL Files you need to 3D print K80CS or K84CS keyboard case at home. They are optimized for 3D printing on FFF (RepRap) printers without heat chamber and with a build bed of at least 177 x 191 mm and build height of at least 32 mm. The files are licensed, not sold. You can look at the license here. The files are provided as they are without any warranty. The only thing you can assume is that there is a person which 3D printed a keyboard case from these files. The final K80CS keyboard case (defined by the STL files) is in red on the picture below.
Full K80CS keyboard case
The final K84CS keyboard case (defined by the STL files) is in blue on the picture below.
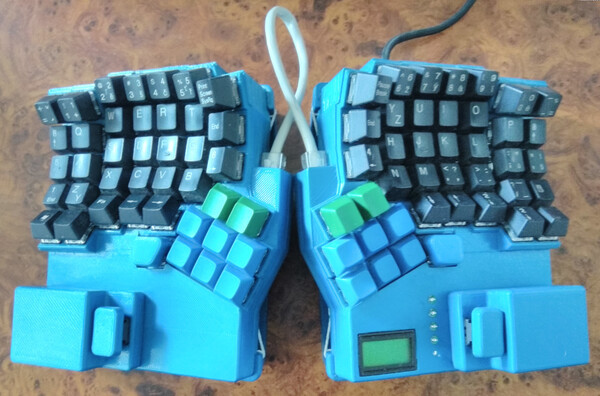
Full K84CS keyboard case
More technical information about the case and the keyboard as a whole can be found in this deskthority thread. This thread is also the best place to get additional technical information about the keyboard.
The STL Files are provided by HCK, s.r.o.. You can buy the license and also obtain the K84CS STL Files themselves through share-it. The price for one license is 14 € plus VAT, sales tax, or whatever other fees your local government imposes on you (if any). You can also get technical support about the keyboard case by writing an email to katy (at) hck (dot) sk but it is better to post a message to the deskthority thread. If you have questions about orders, payment and delivery then check out Customer Care Center.
The K80CS STL files can be downloaded for free here under Creative Commons Attribution ShareAlike (CC BY-SA) lincense. You can always buy the K84CS files to support the project :)
Each side of the case consists from 3 parts: the key part, the palm part, and the bottom. You need to 3D print these separately. Print them all with ABS and print them the way they are in the models except the palm parts. Print the palm part upside down (rotate them in your slicer by 180°). Print also the glueing template. It will help you to glue the key part together with the corresponding palm part.
Right hand side palm part has two versions in the STL files. One is with a hole for PDI connector and the other one is without the hole. Print only one of them. If you would like to debug the firmware then use the version with the PDI hole and use right angle pin header for the PDI footprint on the controller PCB. If you do not inted to have an easy access to the PDI debug port then print the version without the PDI hole and use a straigh pin header for the PDI port.
If you do not own an FFF 3D Printer (a RepRap) then you can ask somebody else to print the case. If you want to get the case as cheap as possible and are willing to postprocess the printed parts yourself then ask for delivery of the raw printouts (with all the support material still attached to the model). The material cost for the whole case is about 8 €. You should be able to talk somebody with an FFF 3D Printer to print it for you for a price in the range from 50 to 100 €. Maybe cheaper if you lucky.
Notice that the proper slicer settings depend on the kind of 3D Printer used. To print the case successfully the important settings are the ones related to the support material. The support is required only for the key parts of the case. Here is an example of the support related settings you can try:
- support structure type: lines
- use support for angle: ≥70° (0° means a vertical wall)
- support fill amount: 20%
- support X/Y distance: 1 mm
- support Z distance: 0 mm
- use only suport which can touch build plate
- brim width: 2 mm (If you use brim then the build area needs to be bigger than it is stated in the description to provide space for the brim. It is good to use a small brim to stabilize the support material.)
The model can be printed sparsely. It will be strong enough with low infills.
- wall thickness: 1 mm
- infill amount: 30%
- layer height: 0.2 mm
You can make your own ABS-glue by melting the ABS plastics in acetone. You can use the scrap plastics from the support material and the adhesion pads of the raw printout of the keyboard case. Or you can use the filament you used to print the case.
- cut away the adhesion pads
- first use nail scissors and cut about 1 mm (or more if there is no good access) away from the walls
- use a utility knife (short thin blade) to cut just the pads just along the walls
- be carefull to not to delaminate (break) the outer wall next to the RJ45 connector; if it happened then fix it with acetone as described later
- pry away the support material
- thin tip pliers are good for this
- if the support material holds very strongly then it is safer to cut the suport in the middle and tear it apart from the cut to the keywell sides (this is to prevent delamination in the keywell plate)
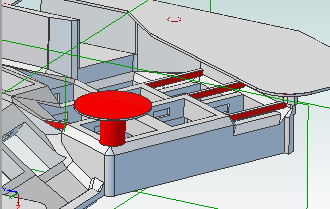
- cut away the additional support around the thumb cluster (it is in the red color on the picture below)
- clean up (cut away) the strings (if any)
- paint it with acetone
- this will make the part much stronger
- it will make it smoother too so dirt will not stick to it
- fix delamination or broken parts with acetone or ABS-glue
- simple delamination
- pull apart the delaminated part away perpendicularly to the crack (pull it very litle ... only so that it opens by a small fraction of a millimeter)
- use a brush soaked in acetone and paint along the crack
- the acetone will fill the opened crack
- wait about 30 seconds and press the model to close the crack
- it will hold well enough
- bigger defects which miss materials need to be filled with ABS-glue
- paint them with acetone so that the surface of the defect softenes a bit
- add ABS-glue to fill the defect
- let it dry (about a day)
- remove the excess ABS-glue with knife
- drill out the M3 screw holes with a ø 3 mm drill
- insert M3 nuts into the hex sockets of the top parts of the case
- use M3 screw with washer to pull the nuts into the sockets
- if the sockets are too small (it is rare but it may happen because of imprecision of the used 3D Printer) then remove the dirt or blob which prevents the nut to fit inside the hex socket; if the problem is more serious then
- insert long M3 screw into the hole leading to the hex slot
- screw M3 nut on the screw (screw it in only 360° or at most 720°, i.e. one or two threads)
- add a small ball of tin on the tip of your soldering iron
- heat the M3 nut and pull the M3 screw to fit the nut into the hex socket
- if the insertion of some of the M3 nuts resulted in cracks of the ABS plastics around the hex socket then paint it with acetone again or even fix with ABS-glue
- glue the two parts together with ABS-glue
- wrap the glueing template at places of the palm and key part connection with a layer of aluminium foil (or something else to which ABS does not stick); this is to prevent gluing of the template to the case
- wet the contact faces with acetone
- add a thinner ABS-glue (viscosity about 5 Pa.s (like honey))
- wet the contact faces with acetone
- attach together the palm part and the key part
- screw in the gluing template to fix the position precisely
- the middle part of the connection can be separated a bit
- press together and hold
- the ABS-glue will hold enough quite quickly
- you can release your hold in about 5 minutes
- even while holding the middle part of the connection use your other hand to wet a brush in acetone and to smooth any ABS-glue pushed out from the connection
- don't worry to to press the brush a bit while smoothing
- the acetone will get very dirty with this, use a small amount in a separate pot which can be later used to make another ABS-glue or just discarded
- you may decide not to smooth out the connection as indicated in this step and just let it dry and cut away the excess ABS-glue when it dries
- add additional ABS-glue to the connection from the inside of the case
- let it dry for at least a day
- unscrew the gluing template when it is dry
- cut away the excess ABS-glue
Acetone painting is an alternative to acetone vapour bath when treating ABS printouts. Acetone painting is safer and easier to do but it comes with danger of white smudges. These happen because ABS melts in acetone and ABS natural color is white. The melted white ABS will stick to the brush and gets deposited on the surface of the part. The darker the ABS is the more these white smudges matter.
Acetone is available in shops which specialize in selling stuff for home builders or people who like to tinker or improve their homes (e.g. Baumax). It is sold as a solvent to aid removal of old (dry) paints or removal of cellulose based glues. It is often sold in volumes of about 0.4 l. You will need about 0.1 l for one case.
- use clean acetone
- if your acetone is getting too contaminated (too white) then use it only to do painting of the case inside (where the smudges do not matter) or use it to make ABS-glue
- do not press when painting with acetone
- the goal is only to deposit a thin layer of acetone on the part so that it can soak in the ABS part, fuse it from inside, and smooth the surface of the part
- pressing the brush will lead to more acetone contamination
- make sure puddles of acetone do not happen on the part
- especially when the acetone is already dirty then these puddles will leave the white smudges when they dry up
- it may be usefull to leave tiny puddles of acetone on places which you want stronger and where possible white smudges do not matter (a good examples are the hexagonal cutouts for the M3 nuts)
Only the main points. This is not an exaustive list.
- read and obey the safety instructions on the acetone packaging
- it is highly flammable
- it evaporates quickly - work in well ventilated room or outside
- its boiling point is 56°C - do not leave it in hot environmets (like a car in summer)
- it melts ABS plastic - do not pour it to kitchen sink or toilet (drain components are often made from ABS plastic - they could melt)